Introduce
Starting in 2011, when Intel launched the Sandy Bridge processor family and continuing to the present, to be able to officially overclock is allowed by Intel. Then users must accept to buy a CPU with the K/KF/X suffix (eg i5-2500K) and a Z/X series motherboard to support overclocking these processors. This is something that is not very interesting to users, especially overclockers or technology lovers, because among them not everyone can afford and need to buy these products. above due to the high cost.
After that, ASRock circumvented Intel's rules by creating the popular Hyper series of motherboards with the ability to overclock non-K. As a result, the sales of the ASRock Hyper line were selling well at that time, users were interested in spending A money to buy products with A+ value. But the fun was short-lived, ASRock Hyper eventually became a thing of the past as technology developed, processors with higher clocks, more cores were born and the non-K overclocking trend became a thing of the past. Intel Gen 12 was born. In addition to powerful performance and a reasonable price, Intel "implicitly" creates a big push when it allows overclocking non-K processors on some Z690 and B660 motherboards. However, the biggest barrier to this, is that the price of motherboards that can overclock non-K processors is very high, and forced to use DDR5 which is very expensive.
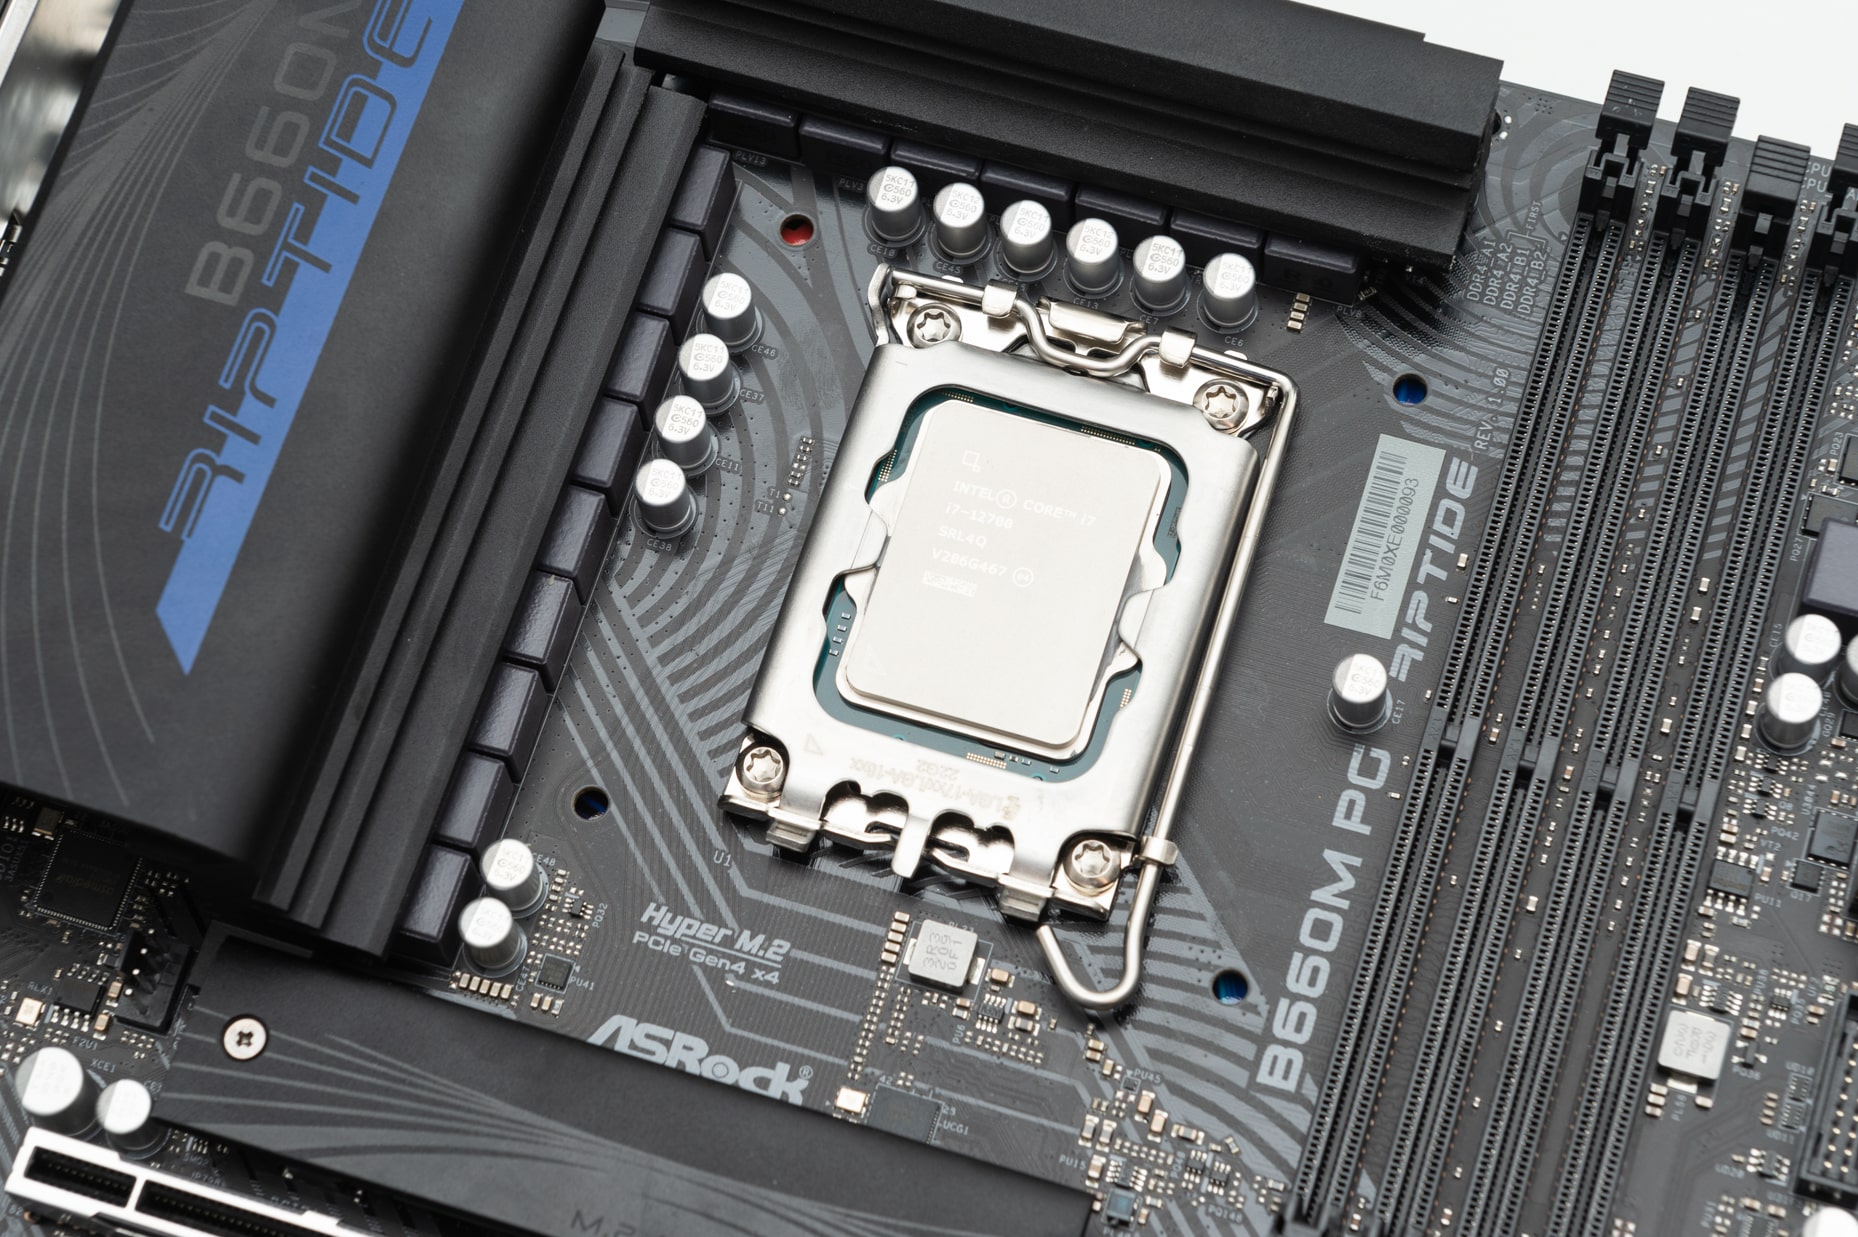
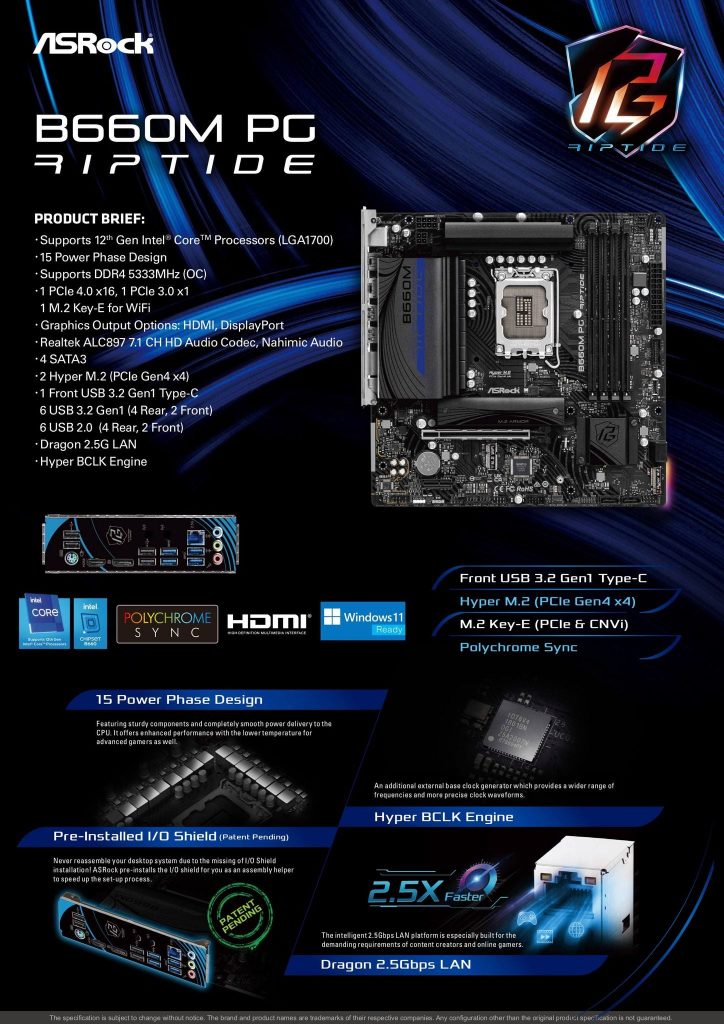
ASRock has once again appeared as a savior for users who are loyal to the value of performance and price and love to play. When they officially introduced the mainstream B660M- PG Riptide motherboard series, with a lot of valuable improvements, most especially the ability to support overclocking Intel Gen 12 non K processors and support Popular DDR4 at a reasonable price.
Before ASRock B660M-PG Riptide was born, only the motherboards listed below were capable of non-K overclocking, including: ASUS ROG MAXIMUS Z690 EXTREME / Formula / Hero / Apex, ASUS ROG STRIX B660 G/F GAMING WIFI, Gigabyte Z690 Aorus Tachyon, MSI Z690I Unify/Unify-X and ASRock Z690 Aqua OC and Z690 Taichi Razer Edition. In addition, not long ago, MSI also introduced to the world the B660M Mortar MAX version with the new OC Engine that can overclock non-K.
What is non-K overclocking?
Non-K overclocking is basically implanting an external clock generator on the Mainboard (External Clock Generator) to overcome the limitations of overclocking that Intel has placed on the previous Skylake or Alder Lake processors. in now. It is understandable that the function of the pulse generator chip that ASRock or other motherboard NSX put on their Mainboard will destroy the mechanism that does not allow OC non-K CPU from Intel, of course the BIOS must still allow it. Not to mention, this feature previously for systems using Skylake processors will allow users to increase the processor's clock in increments of 0.0625 MHz each time, surpassing the set limit of 1MHz. like Intel's.
In fact, the naming of non-K overclocking is not really accurate, if it is correct and standard, it must be called BCLK (Base Clock) overclocking, so not only Intel Gen 12 non-K processors but also other microprocessors. K/KF/KS logic can be overclocked on motherboards allowing higher BCLK values than default (up to ~103MHz on many motherboards).
ASRock used the BCLK IDT6V4 1801BN clock generator IC to help the motherboard overclock BCLK. It seems ASRock has a tradition of using IDT type clock generators, as the previous Hyper series also used this type. Meanwhile, MSI has launched a new version of Mortar Max Wifi that can overclock non-K but uses the Renesas RC26008 clocking IC .
Is there a change in non-K overclocking in the Intel Gen 12 series?
Basically, for many people who have experienced or overclocked a lot on previous platforms, especially the LGA775 platform, most people have the ability and knowledge to "easily" increase performance with just a few taps.
Going back to the old problem a bit, in the Haswell and Broadwell processor lines, Intel now uses an integrated voltage control circuit in the CPU (FIVR), this circuit allows better control in the components. internal voltage section. However, when introducing the Skylake platform, Intel abandoned the integration of FIVR into the CPU, this can be seen as a small adjustment by Intel when disabling it right in the Core component. With this adjustment, the overclocking on Skylake will also have a change compared to Haswell / Broadwell when the rails providing voltage on the board to the CPU are also different.
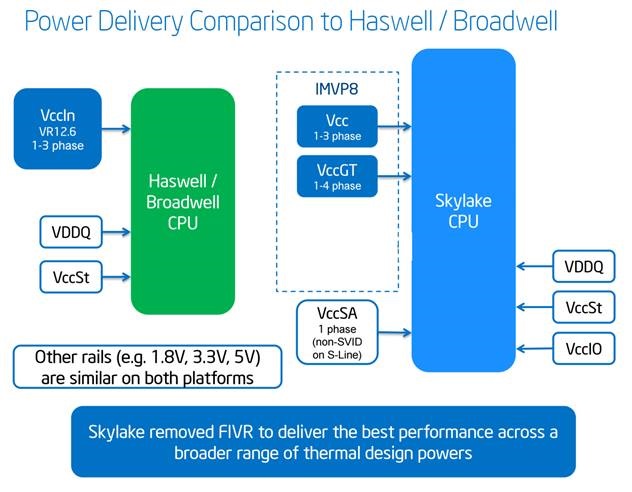
Several generations of processors back, Intel introduced to the world the SVID-Serial Voltage Identification feature technology, which is a protocol used by Intel to communicate with voltage regulators. The function of SVID is to communicate with the PWM controller to control the ability to regulate voltage for the microprocessor. This allows the microprocessors to have their own optimal voltage depending on current usage conditions (temperatures, clocks, different loads, etc.). Overclockers can use a combination of SVID and LLC (Load Line Calibration) for an optimal vCore.
Older processors like Haswell can only be overclocked to about 3-5% BCLK because BCLK is still tied to DMI and PCIe. In Skylake, these two components are almost separate, so users can push BCLK freely without having to worry about adjusting the PCIe clock. And when overclocking BCLK, this time will directly affect Core (CPU pulse), GT (integrated graphics pulse), Ring (Cache/UnCore), RAM pulse, System Agent. As shown below you will see:
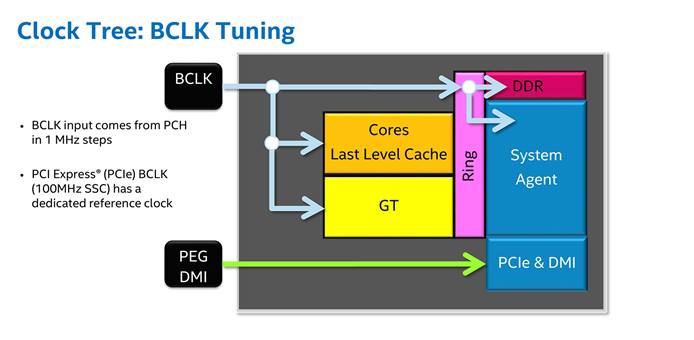
However, with the Alder Lake generation, or Intel Gen 12, the non-K overclocking process once again changed. Accordingly, Intel Gen 12 has two clock generators on its platform. The external clock generator will provide the ability to have a wider frequency range, respond to higher clock levels when changing the allowed parameters. Looking at the Block Diagram we will see, this time, changing the BCLK on Intel Gen 12 processors will directly affect the xP core, xE core, Ring bus and RAM clock. As for the GT and System Agent cores are not directly affected because they are located separately, of course when the RAM clock level increases, we also have to adjust the VCCSA component to ensure stability.

Terminology when overclocking needs to be understood
There are 2 ways to overclock normally, way 1 is overclocking FSB (for LGA775 series and earlier) or BCLK (for later Intel processors) and way 2 is overclocking CPU multiplier ( for CPU lines that unlock the multiplier) or called Ratio or Multiplier. The third way is a combination of customizing BCLK and Multiplier values, often with experienced overclockers using this method most often to find the maximum capacity of a good PC system. of a given processor.

Eject FSB on older motherboards with the SetFSB . tool
Usually, FSB / BCLK overclocking will give the best performance. Because as explained above, overclocking BCLK affects the components in the CPU (Core, Cache, FCLK, Memory... ), leading to the best performance increase compared to increasing the multiplier. which only affects Core pulses.
Of course, with BCLK overclocking requires higher skills (eating more vCore for example) as well as components in the overclocking system must also synchronize with each other in a better direction.
Please repeat some overclocking terms that Newbies need to understand clearly as follows:
- BCLK: Base Clock, default in BIOS will be 100MHz. Changing this speed means changing the pulse of some components as mentioned above.
- Ratio/Multiplier: Multiplier of CPU, GPU, RAM…
- CPU/NB Frequency: CPU or NB processing clock.
- NB Ratio/Uncore Ratio: NB or Cache Multiplier
- DRAM Frequency / iGPU Frequency: Processing clock of DRAM or iGPU
- VCC: Voltage for CPU core
- VCCGT: Voltage for iGPU core
- VCCIO: Voltage for I/O . components
- VCCSA: Voltage supplied to the System Agent component
- VDDQ: Voltage for RAM memory components.
The above terms are closely related, among which:
- BCLK (Base Clock) x CPU Ratio will output the actual CPU clock. When overclocking this component, pay attention to VCC or vCore.
- BCLK x Cache / Uncore / Ring bus Ratio will output the actual clock of Cache / Uncore. When overclocking this component, pay attention to VCC or vCore.
- BCLK x Memory Bus Ratio = Actual clock speed of RAM. When overclocking this component, pay attention to VCCIO / VCCSA / VDDQ
- With Intel Gen 12, BCLK will directly affect xP cores, xE cores, Ring bus and RAM clocks.
Noteworthy points when conducting overclocking
Overclocking it is fun, it's fun, it's a skill set, and each person's knowledge will have different abilities. However, everything can be the same, first of all, according to a certain set of rules, because overclocking will have to follow a few key issues to avoid unnecessary questions later.
- The motherboard must have a good VRM circuit (many phases, quality phases, heatsink to cool the VRM), this is a very necessary condition to overclock to high and run stably, especially when used with CPUs with TDP High.
- The BIOS of the Main is also very important, a good BIOS will help users manipulate as well as balance the stability of the system during overclocking. Not every BIOS is the same as every BIOS, not every Main is the same as every Main, so it takes time to tweak BIOS versions to find the best fit.
- Not all CPUs are the same as all CPUs, some are clocked up to 5GHZ but some are only 4.8GHZ – this is the term called wall (wall ratio, wall bus). There are CPUs that reach 4.5GH at 1.2 Voltage, but there are CPUs that eat 1.3 voltage or more. What you need to do is take the time to detect the appropriate vCore with the CPU clock level in use, too much or too little is not good.
- Check the heatsink in use, with stockfan (the heatsink comes with the CPU), I do not recommend overclocking the processor to high. Poor heat dissipation will bring instability to the system when overclocking (unstable) or cause overheating, destabilizing the system.
- The higher the CPU clock level, the more power it consumes compared to the lower clock level. For example, Intel Core i7-6700K at default 4.2GHz only eats about 35mV, but from 4.2 to 4.5GHz can eat up to 100mV or higher.
- Thermal glue is a heat exchange solvent between the heatsink and the CPU surface, using high-quality glue will help cool the system better, reducing the temperature during use. Some popular types with good quality today such as MX4, MX5, bear glue….
- Using a real power supply with good quality components, avoid the problem of voltage drop when overclocking the system leading to damage to its internal components.
- It is recommended to use SSD to boot Win, the faster Win and soft boot process will reduce many operations. Make the overclocking process run smoothly and quickly.
- The Win version should be clean and error-free.
Overclocking non-K on ASRock B660M PG Riptide motherboard
ASRock B660M PG Riptide with BIOS 2.02 Beta version, the PL1 level manually adjusted or customized by the Base Frequency Boost feature has been raised to a maximum of 200W PL1 and PL2 241W. This upgrade ASRock has also clearly noted for users to pay attention when using the maximum value of 200W with the following content:
“MAKE SURE YOUR SYSTEM HAS THE BEST AIR CONVECTION. BECAUSE WHEN THE POWER LIMIT VALUE IS APPLIED TOO HIGH, THERE ARE SOME ASSOCIATED RISKS, SUCH AS DAMAGE TO THE SYSTEM DUE TO OVERHEATING. UPDATING THIS BIOS VERSION SHOULD BE DONE BY ENSURING THE EFFICIENCY AND COST OF THE PC SYSTEM. IF YOU ARE UNSURE OF THE RISKS, PLEASE SEEK PROFESSIONAL ADVICE.”
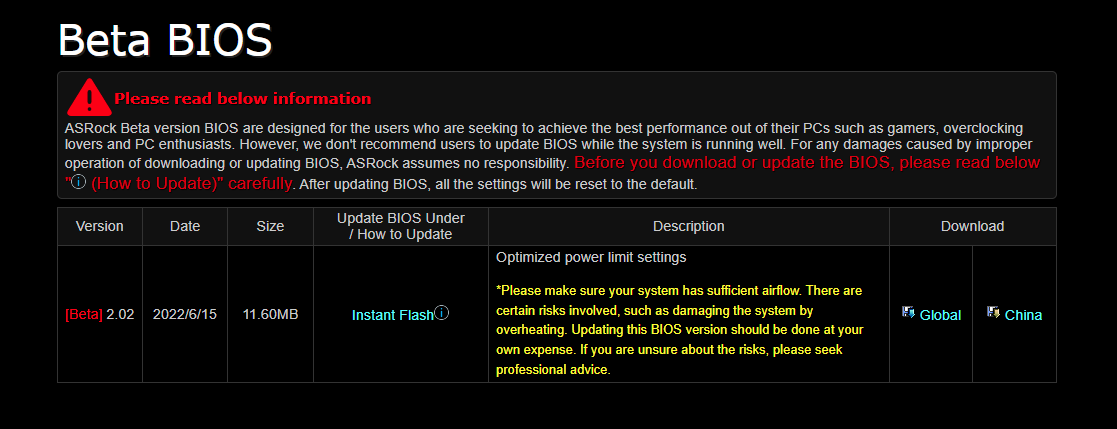
The reason for upgrading to this BIOS version is because version 1.08 is limited to 140W, making users who want to use processors like Intel Core i7 12700/12700F and above want to increase performance. also difficult to achieve because of electrical limitations.
Test system
- Processor Intel Core i7 12700KF – Intel Core i7 12700 – Intel Core i5 12400
- ASRock B660M-PG Riptide Motherboard
- Kingston Renegade Memory 4600MHz 2x8GB
- SSD ADATA SX6000NP 256GB and Kioxia Exceria Pro 1TB
- VGA Inno3D RTX 3080Ti X3
- Cooler Master PL360 Flux + MX4 heatsink (in case of using Core i5 12400, I don't use glue).
- PSU Silverstone ET750 / MSI A650BN
- Window 10 Pro 21H1 with some software such as CPU-Z, Cinbench R23, HWMonitor, Blender, VRAY ...
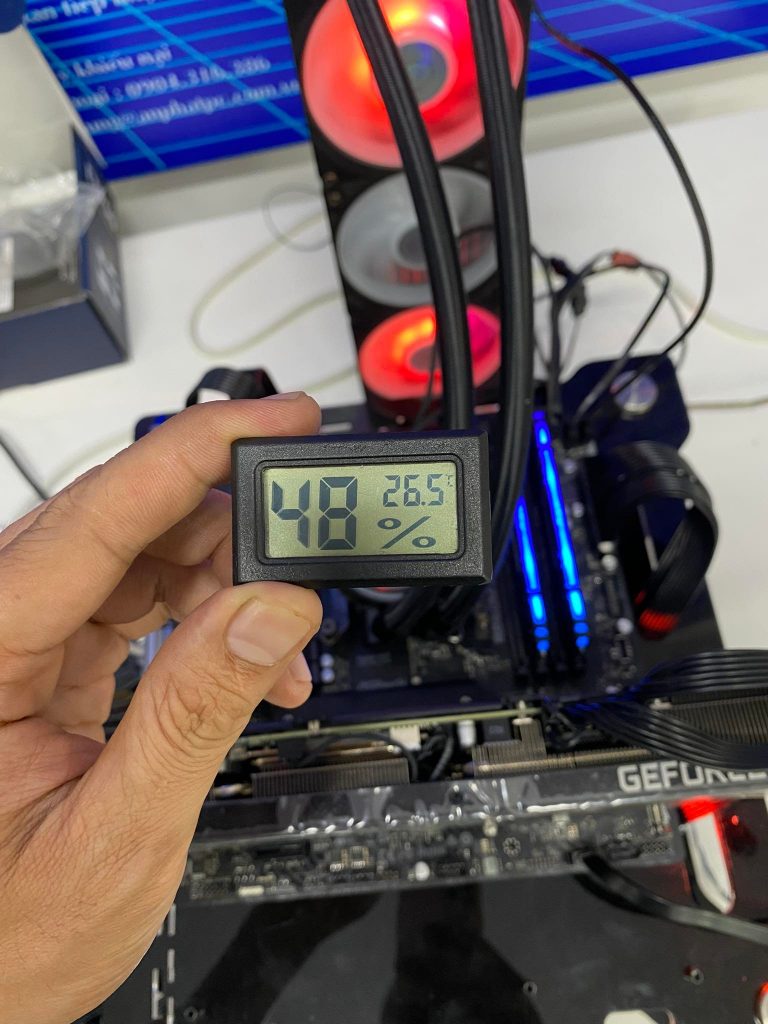
- Room temperature 26.5 degrees Celsius, system is placed on Benchtable.
Step 1: Go to BIOS, go to the OC Tweaker tab and adjust the Base Frequency Boost item to 200W or 180W depending on the processor used. It is recommended that processors such as Intel Core i7 12700 / 12700F should leave this item at 180W.
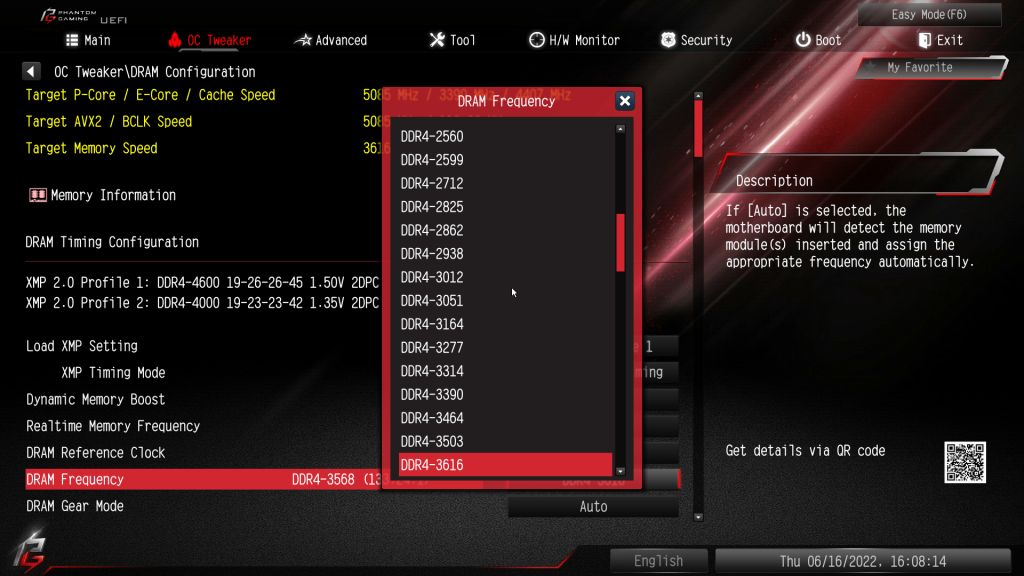
Proceed to enable XMP Profile for RAM in the DRAM Configuration section. Remember to plug in A2, B2 or you will get an error. Next go to CPU Configuration and go to the next step.

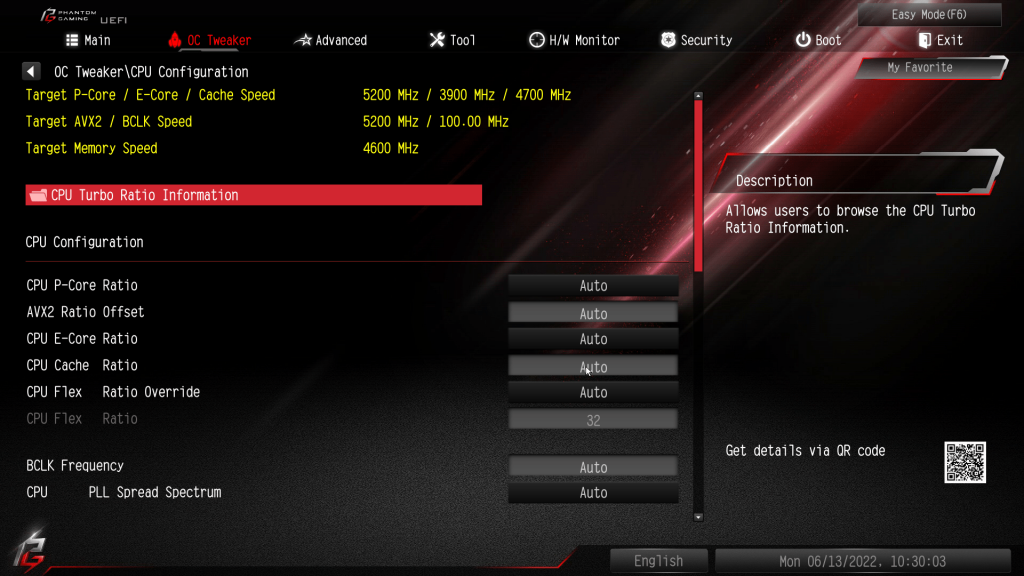
Step 2: In the CPU Configuration section, adjust the CPU P-Core Ratio value to All Core. Then adjust the All Core Ratio value to each level that the processor is applied to. Typically, the simplest and most stable levels for all non-K processors available are as follows:
- For i9-12900, CPU P-Core Ratio is 47. The easiest BCLK level is 110MHz (Higher depending on processor quality and heatsink used)
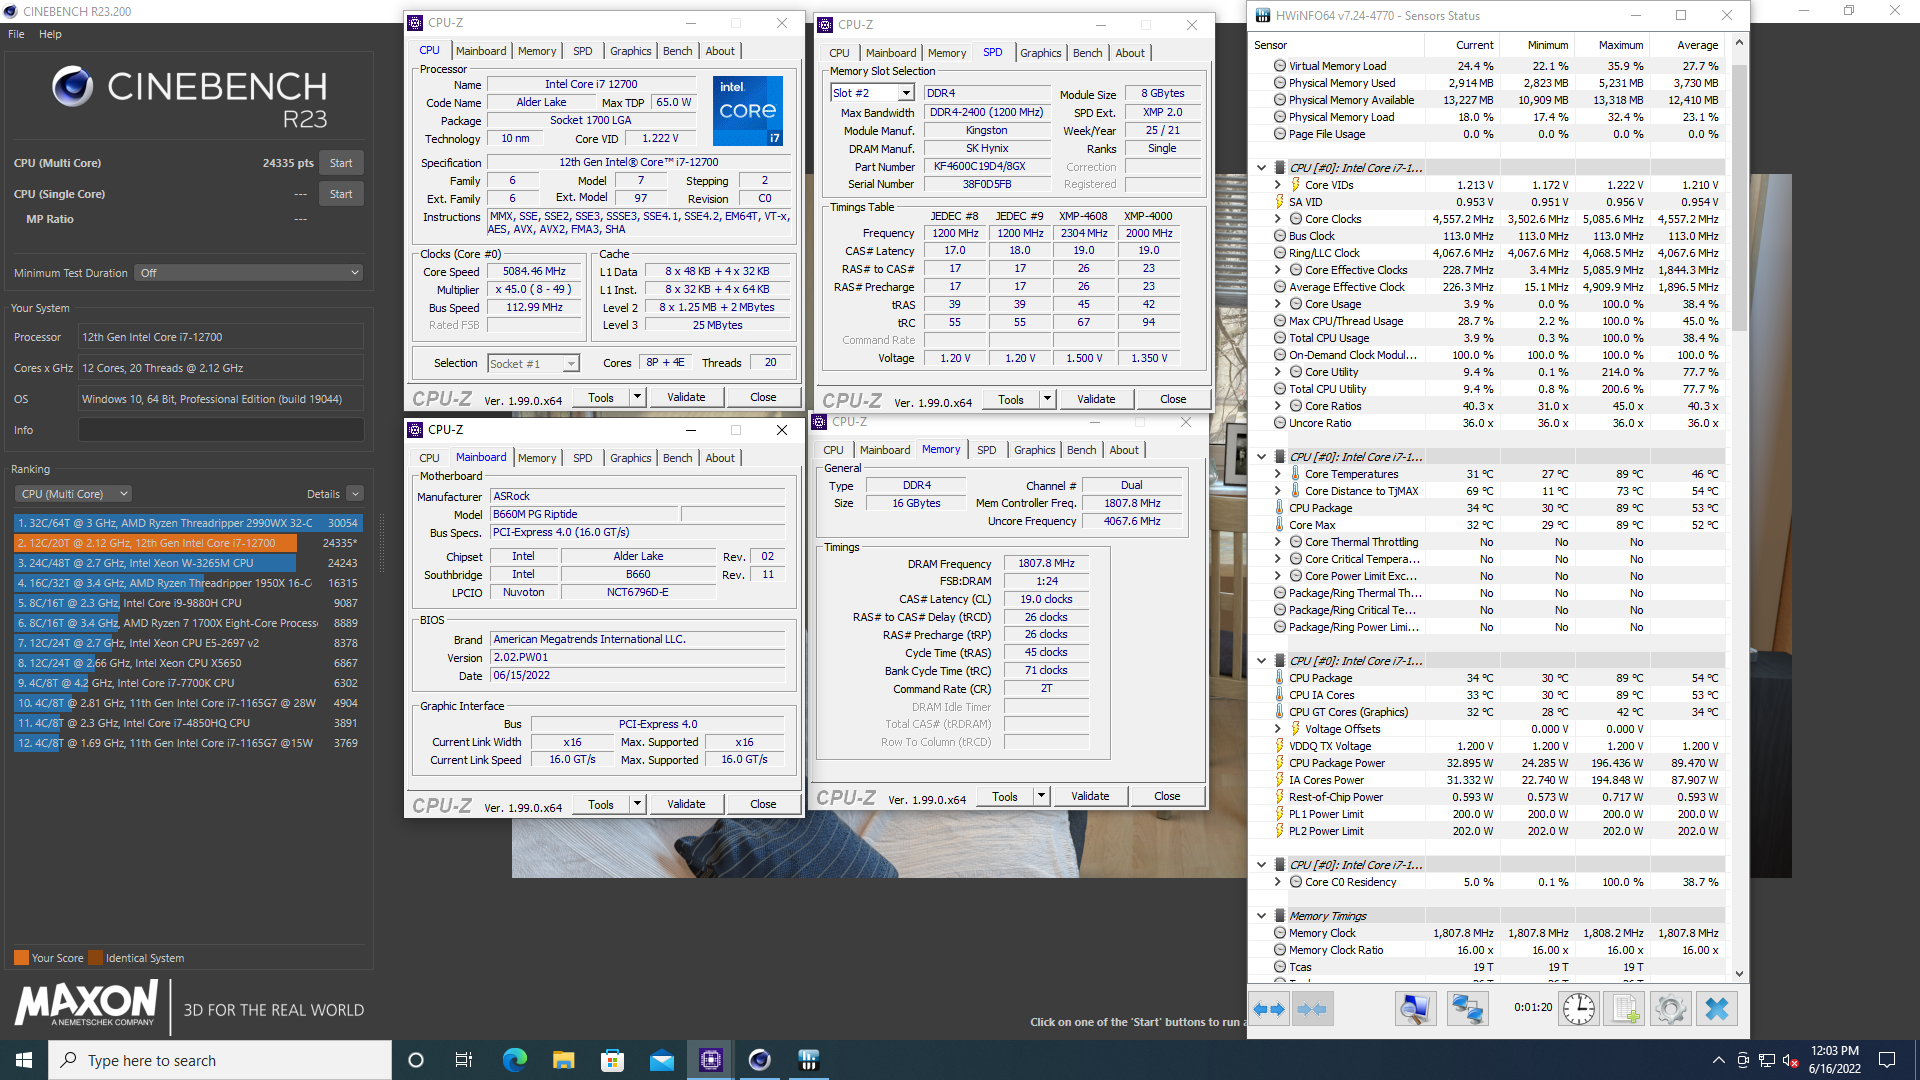
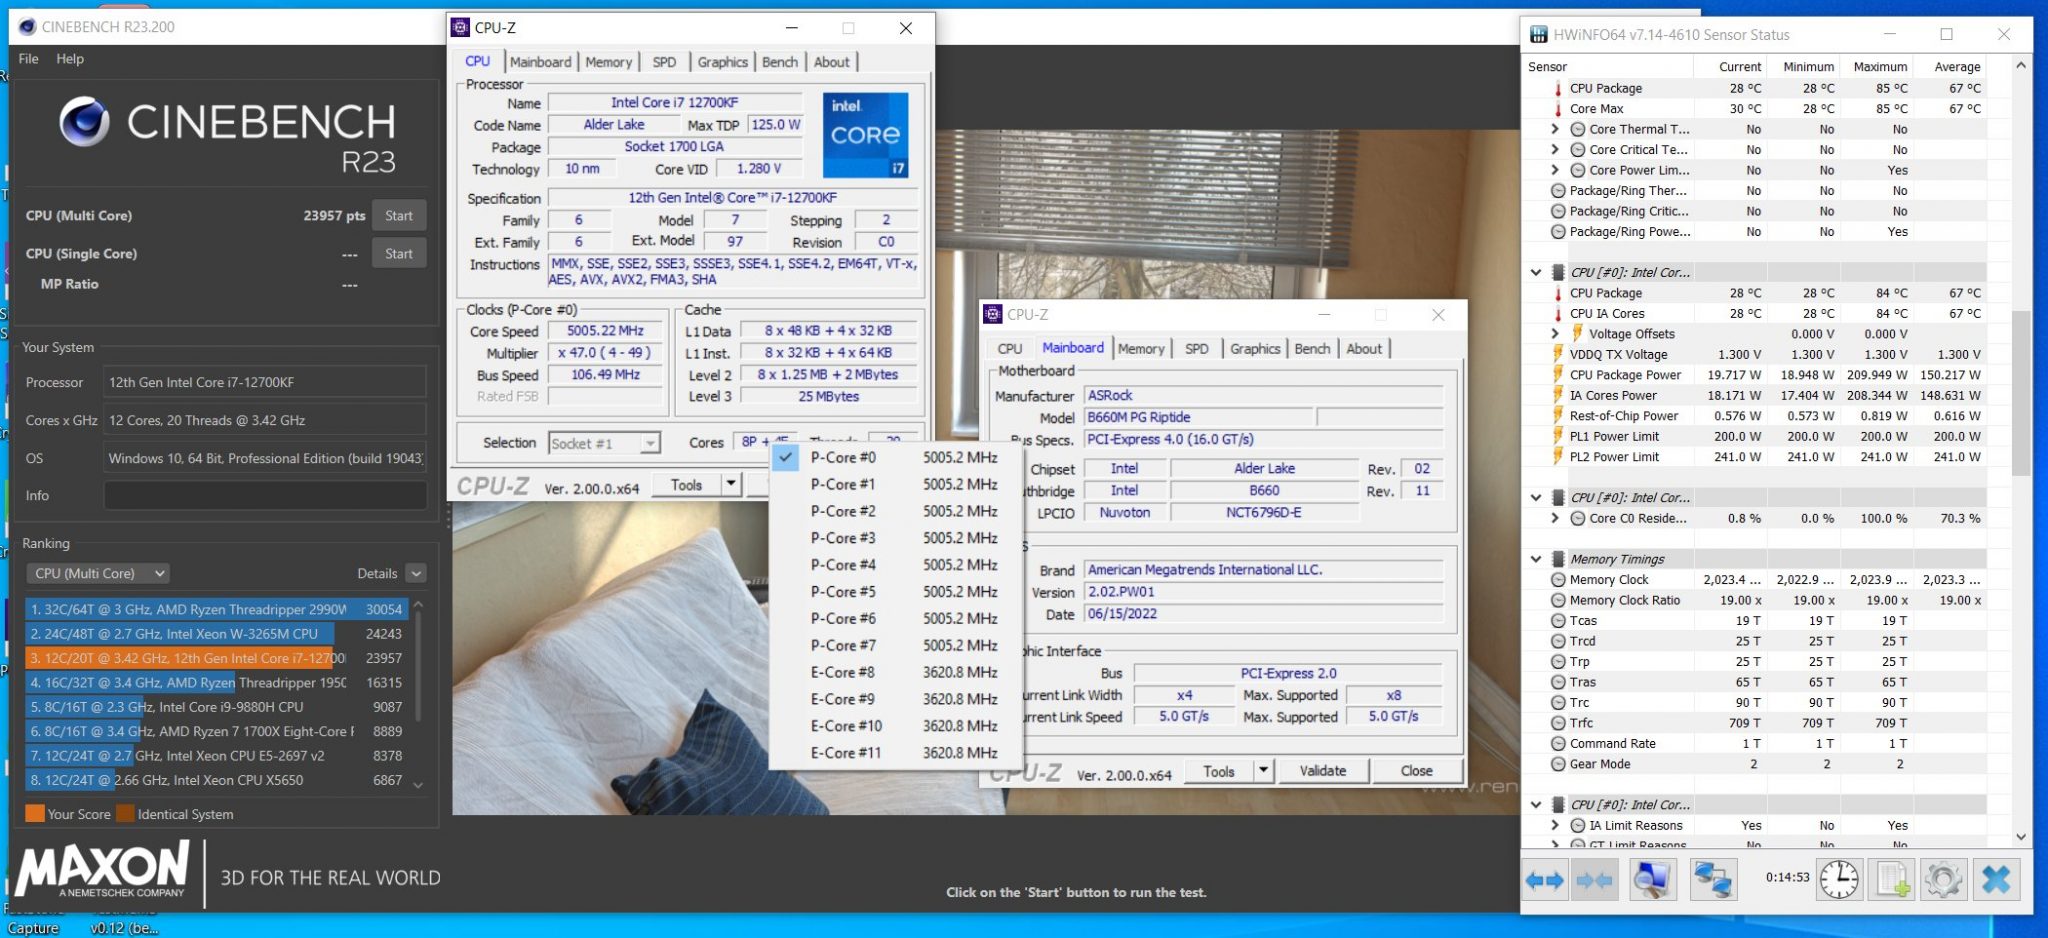
- For i7-12700, CPU P-Core Ratio is 45. The easiest BCLK level is 112MHz (Higher depending on processor quality and heatsink used)
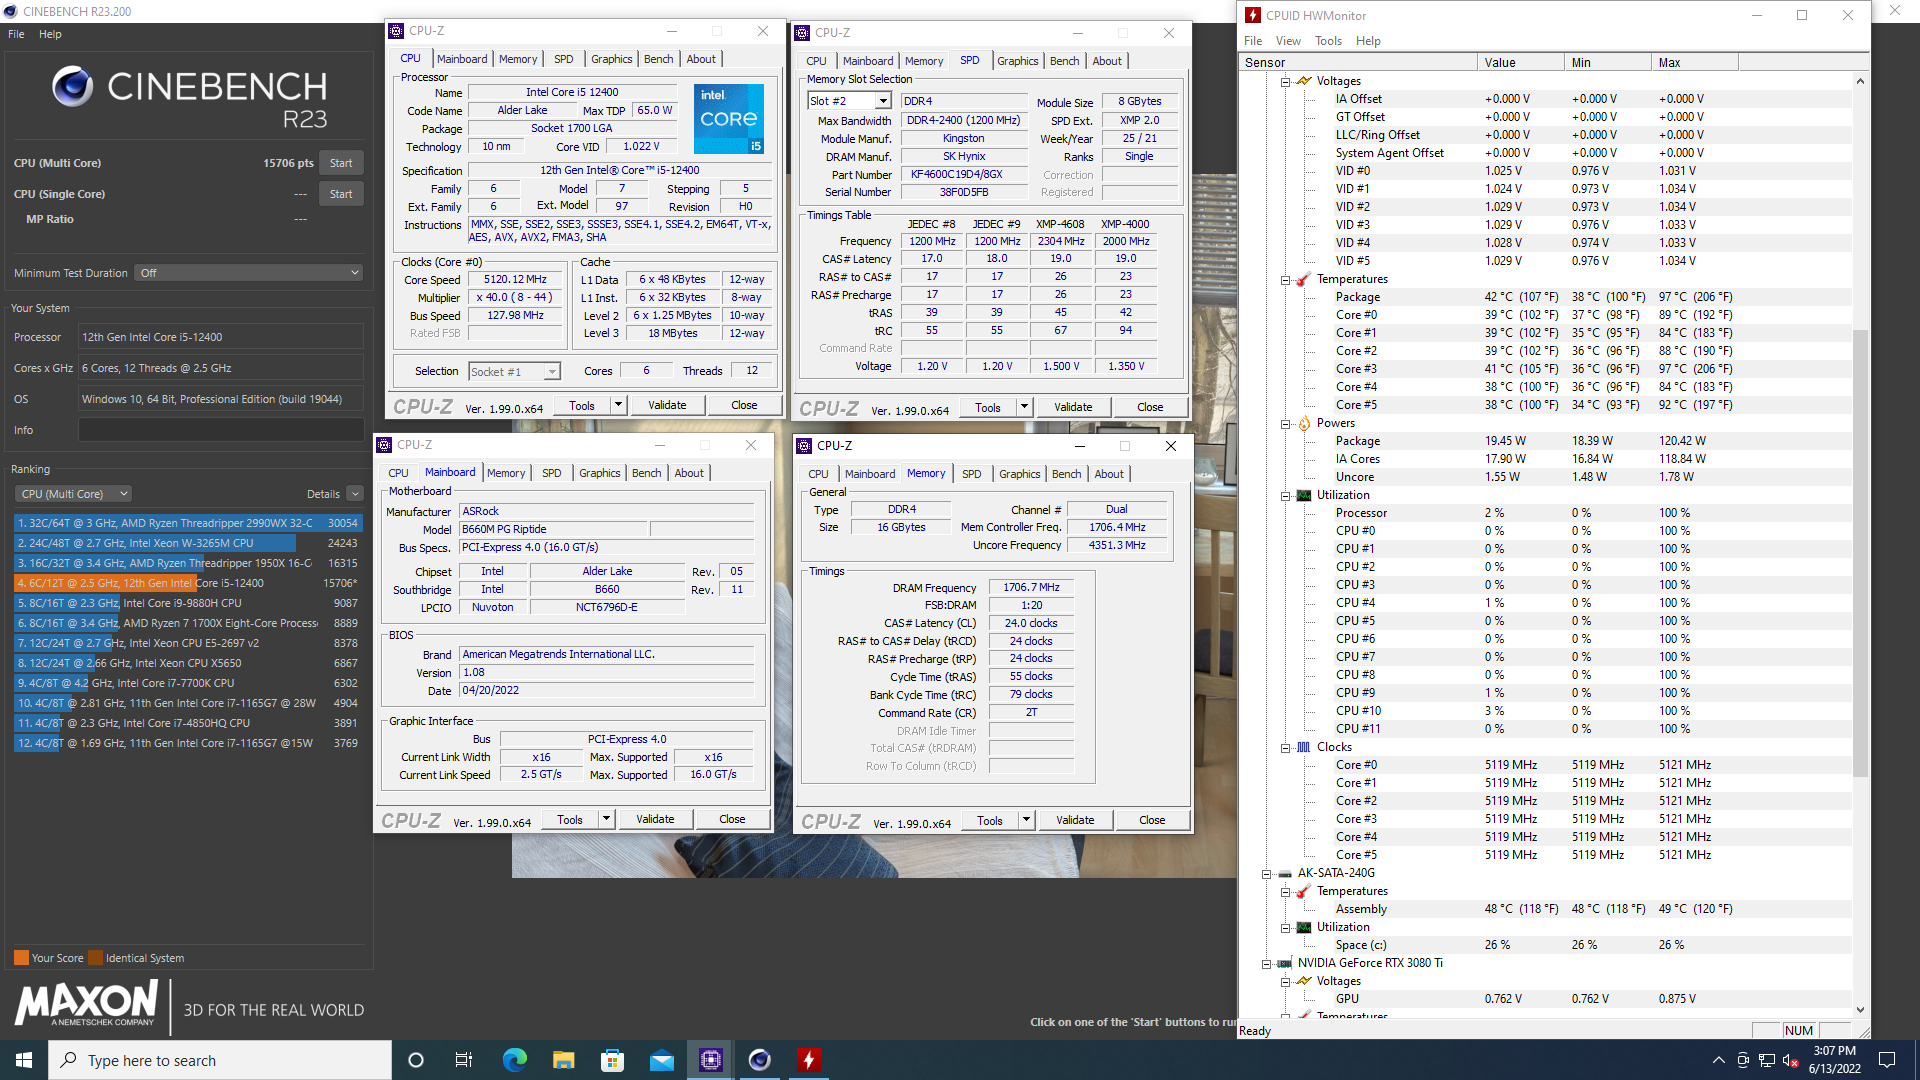
- For i5-12400, CPU P-Core Ratio is 40. The easiest BCLK level is 120MHz (Higher depending on processor quality and heatsink used)
- For i3-12100, CPU P-Core Ratio is 41. The easiest BCLK level is 125MHz (Higher depending on processor quality and heatsink used)
However, as mentioned above, due to BCLK adjustment, the CPU Cache Ratio part must also be adjusted to make it easier to be stable because the BCLK increases, the CPU Cache Ratio also increases. For example in the illustration below that I use Intel Core i7 12700, CPU Cache Ratio I have adjusted to 39 corresponding to the clock speed of 4,407GHz to achieve the best stability but still high performance.
The E-Core Ratio component remains the same, because in fact the E-Core clock when I tested it, there was no need to adjust the trigger to be stable.

Go back to the DRAM Configuration section and adjust the RAM clock level corresponding to the XMP level that the RAM achieves. For example, if the RAM you use has an XMP Profile of 3200MHz, then we adjust this value to 3200MHz in the DRAM Frequency section, because the BCLK increases, the RAM pulse will increase accordingly, so if you don't customize it, it will be difficult to stabilize or fine-tune. Fixed other issues and values related to RAM for better stability. Which, for newbies, is not possible at all.
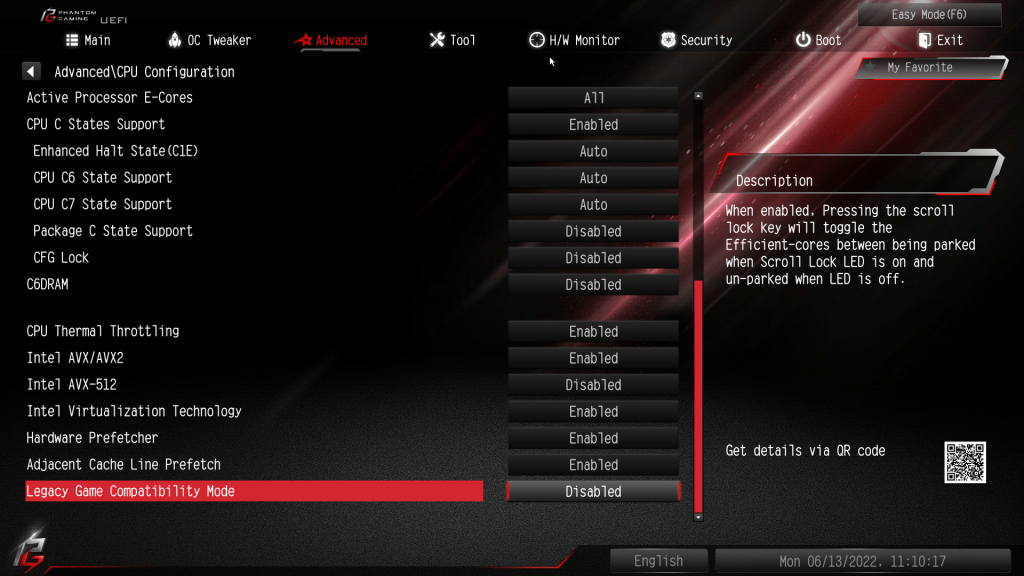
You can disable the C1E or Turbo Boost feature if you want to run All Core continuously to get the best performance.
Finally, go to Voltage Configuration and adjust Voltage Mode to OC Mode. Continue to change the CPU Core/Cache Voltage value to Fixed Mode and enter the desired voltage. For example, with the Intel Core i7 12700 that I applied, the voltage level is 1.285 for 5.08GHz. This voltage value changes as mentioned depending on the processor and heatsink you use. The CPU Core/Cache Loadline Clibration entry adjusts the value to Level 1.
A more in-depth way using V/F Curver or Point will have a separate article.

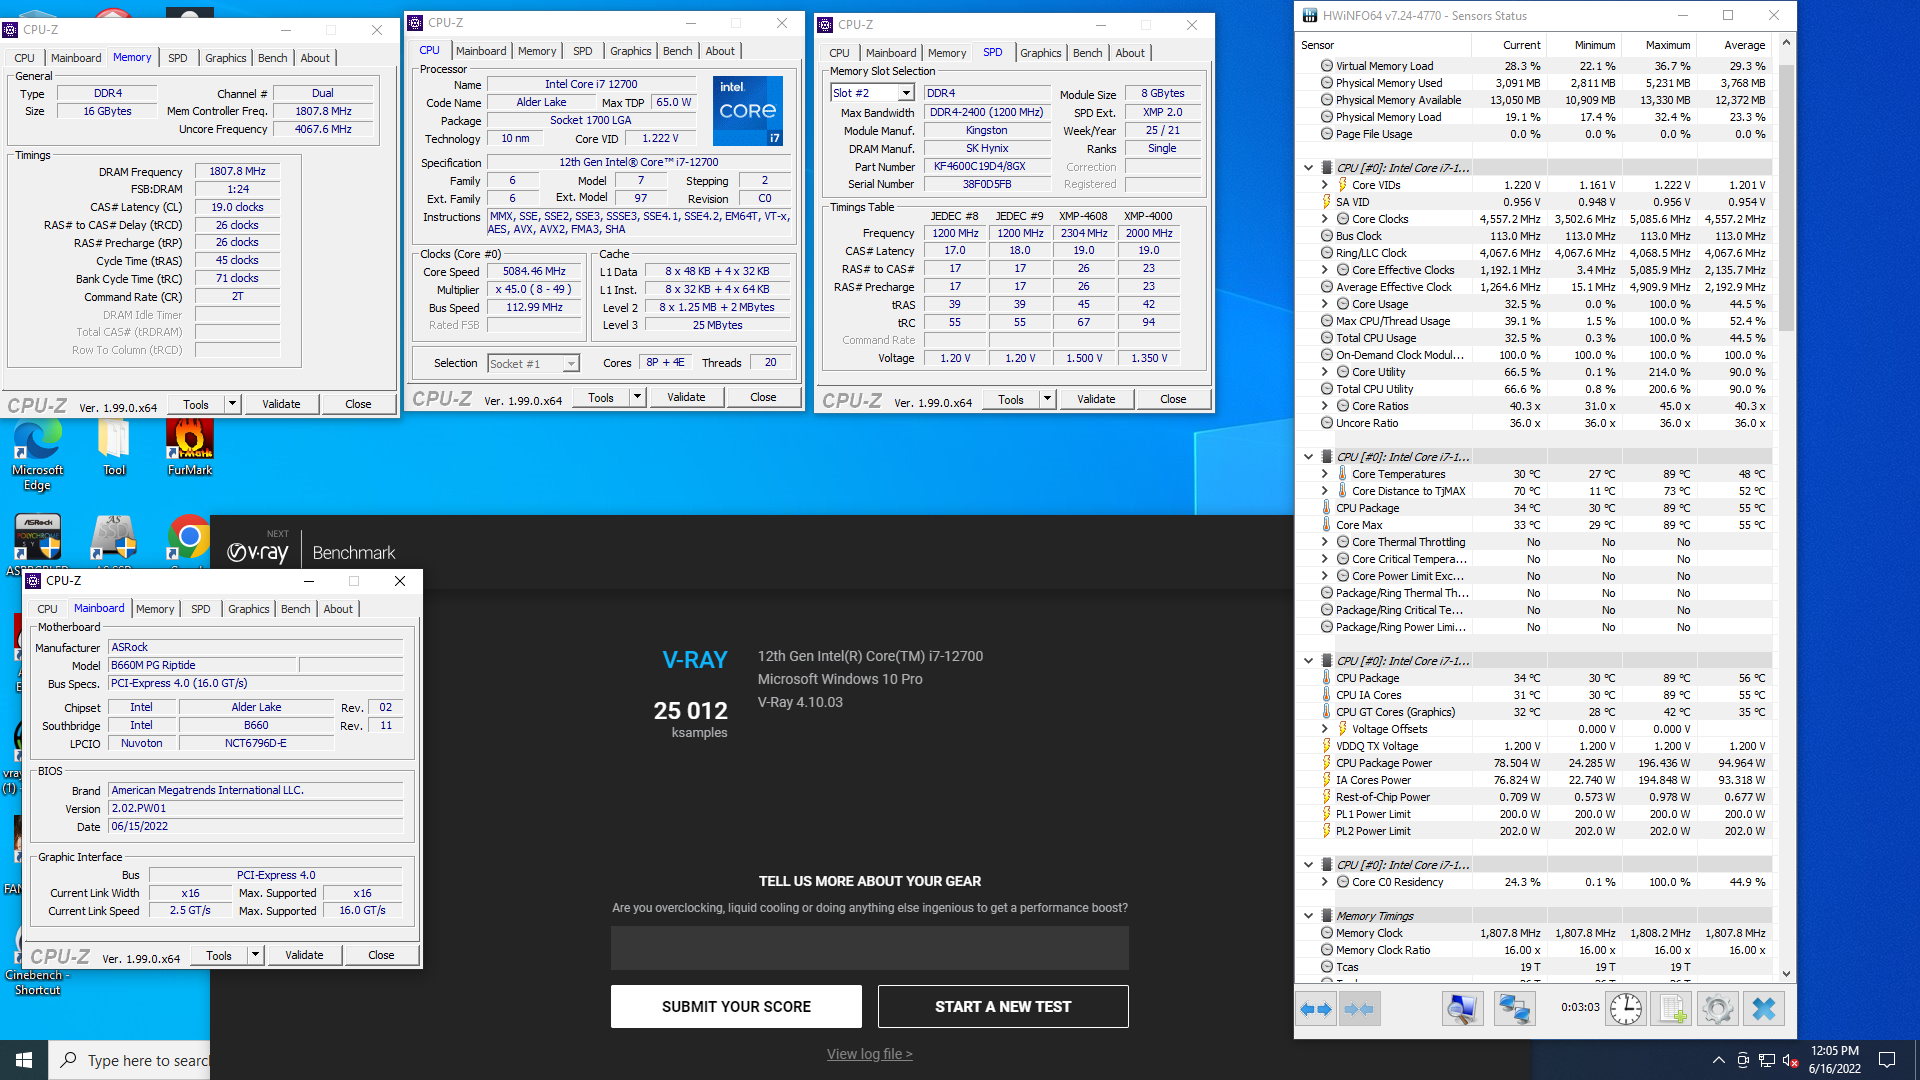
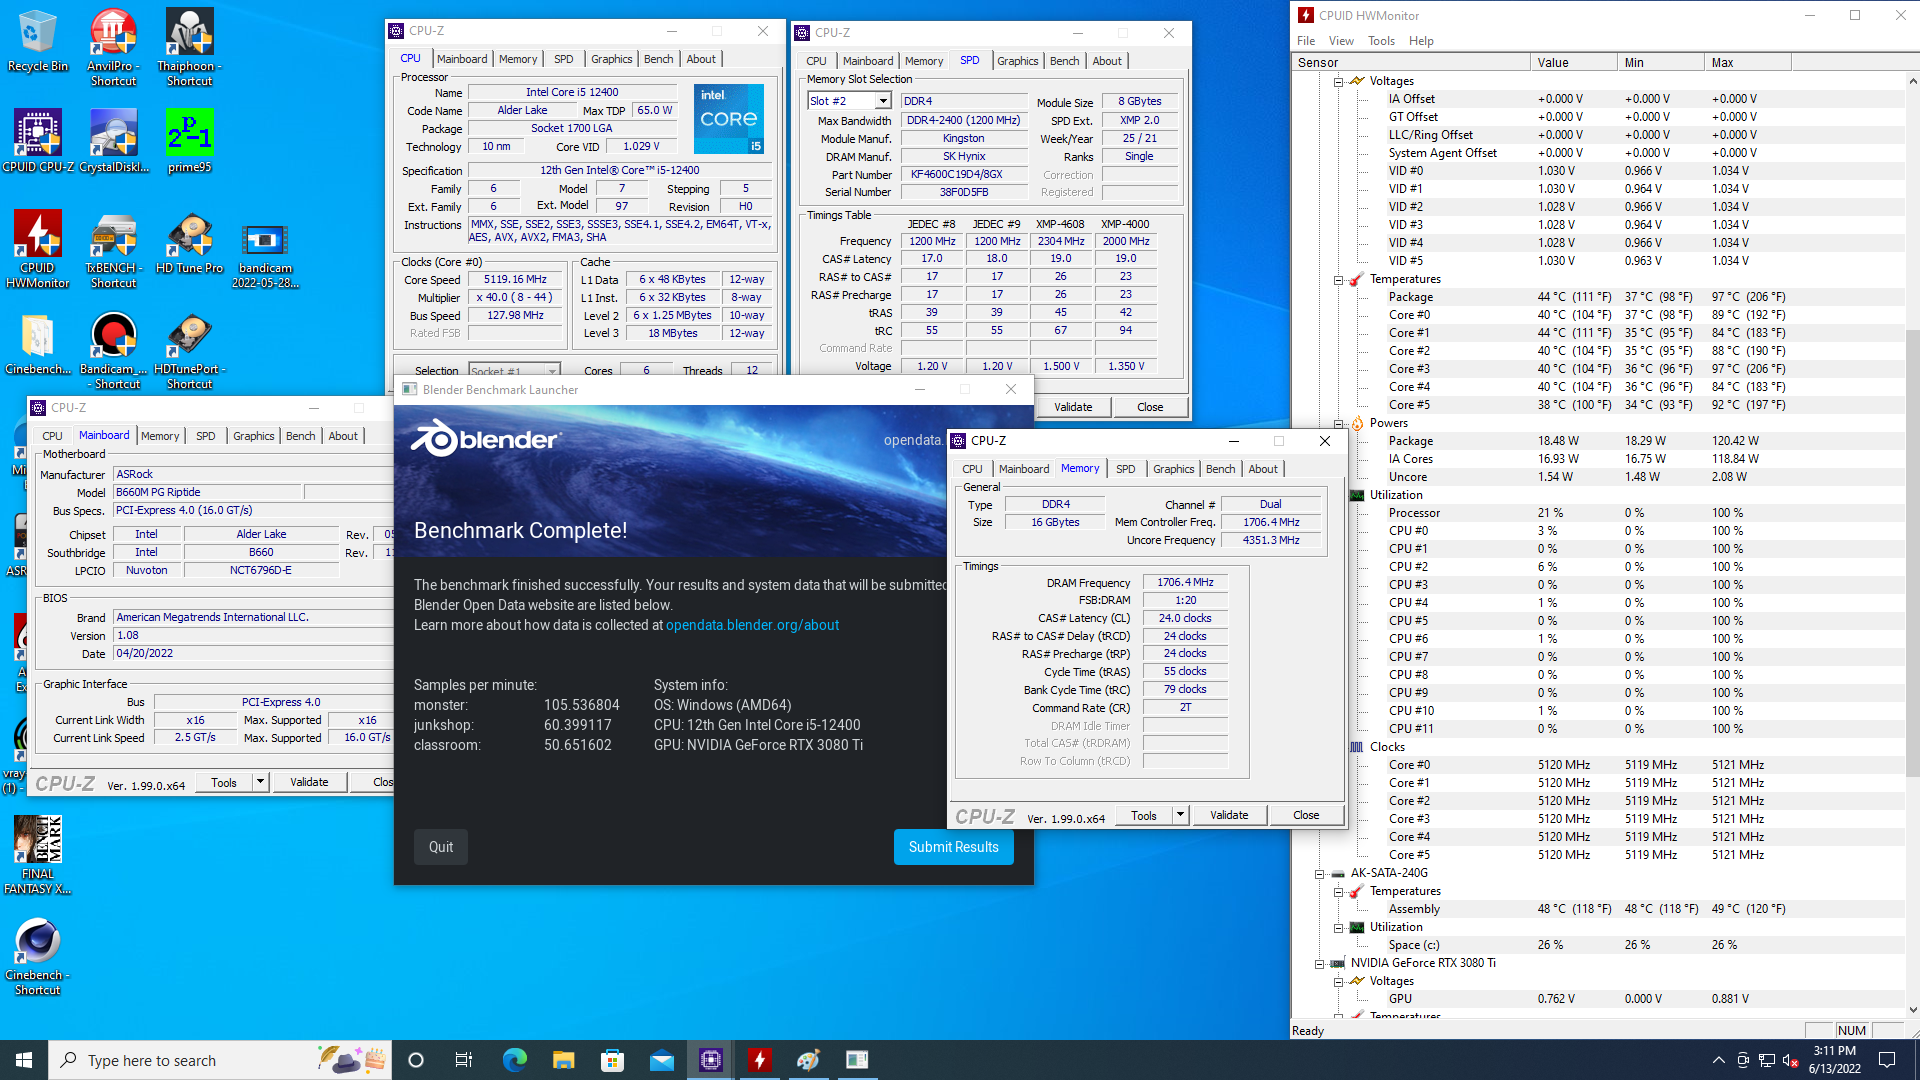
The results give very good scores when the performance increase is very strong, from ~27% to ~50% higher on these processors. And the processors are fully overclocked above 5GHz with ease. However, it seems that the BIOS control is still not good when Vdroop is still a bit high, in some cases the voltage drop is still not good when set in BIOS and in CPU-Z there is a difference. Hopefully ASRock will improve the BIOS in the next versions to improve Vdroop better, although this problem can only be slightly optimized when the VRM of ASRock B660M- PG Riptide cannot be compared with the previous versions. high-end B660 version with a much more expensive price.

Good luck!